
A la carte image delivery
Everyone delivering material to clients knows the pain: You have uploaded files to WeTransfer or SprendIt, pinged the client just to make sure they see the delivery. Hopefully they download straight away, if not then, inevitably:
Two weeks later
– Hi Andreas, the link isn’t working anymore. Could you resend?
Three weeks later
– I can’t find the email with the files. Can you send them again?
One month later
– I can’t find the files on my laptop and my colleague needs them. Could you create a new link?
Each re-submission of the link, or even worse, re-upload of the files takes
For me the issue is delivering images. So I got the idea from a client that complimented my photo-portfolio, «Can’t we have the same image gallery on our website?»
That made me want to try to build an image bank app that I could use to deliver images.
An image bank for each client that, for me, looks like my portfolio but for my clients can be customized to fit their design and brand.
Advantages for me
- Clients get permanent access to their images
- I upload once, they download forever
- Clean, branded experience (not some generic file-sharing site)
- Easy for clients to browse and select specific images
- Controlled access (only specific clients see their projects)
Advantages for my clients
- They get a much more visual overview of their images
- Can easily share the link to staff or partners
- Can configure it to be public (no login needed) for easier access
- Can customize design
- Can use it as a press-image dashboard for easier distribution of images
Designing the vision
So I grabbed Figma and wireframed what I wanted:
I uploaded the wireframes to Claude and described the workflow I wanted:
«I would like help building a php based image bank function for my website www.nofont.com. The purpose of the plugin is to get a url like www.nofont.com/client-name-image-bank or www.nofont.com/another-client-image-bank where my clients can view and download images that I have taken for them.
It will be hosted on a Digital Ocean droplet running Nginx.»
The full prompt is fairly lengthy so I’ve put it at it’s entirety at the end of the post.
Structuring the vision
Here is one key thing when building apps with an Ai. No matter how competent an Ai seems you cant throw everything at it at once. You have to break a project down into stages and tasks. When you do the Ai won’t get lost trying to complete an huge overwhelming task at once … that will only result in code that fails and your app will be an unrecoverable mess.
So for the image bank I clearly described the prerequisites and purpose of the app. I described the functionality of each wireframe. This version of Claude didn’t have a «plan mode» (as the more competent Claude Code has) so I also asked Claude for advice:
Do we need a database setup for this? It will be a very low frequently used service, so would creating .json files for storing image bank (id, name, url and image-ids) and image data (id, description and filename) be sufficient instead of a database?
Claude came back with an «App overview":

File Structure
What files and folder are needed
image-bank/
│
├── index.php            # Admin dashboard
├── login.php            # Login page
├── admin/               # Admin functionality
│   ├── create-bank.php  # Create/edit image bank
│   ├── upload.php       # Handle image uploads
│   ├── edit-image.php   # Edit image details
│   └── delete.php       # Handle deletions
│
├── client/              # Client functionality
│   ├── view.php         # Grid view of images
│   └── preview.php      # Full-size image preview
│
├── includes/            # Shared functionality
│   ├── auth.php         # Authentication functions
│   ├── processing.php   # Image processing
│   ├── functions.php    # Common functions
│   └── header.php       # Common header template
│
├── xxx/                 # json data storage
│   ├── xxxx.json        # User creds and roles
│   ├── xxxx.json        # Image bank metadata
│   └── [bank-slug]/     # One folder per bank
│       └── xxxx.json    # Metadata for images
│
└── images/              # Image storage
    └── [bank-slug]/     # One folder per bank
        ├── original/    # Original images
        ├── preview/     # 500x500 preview imgs
        └── thumbnail/   # 100x100 thumbnail imgs

Data Structure
What data and content is stored what file
File: users.json
{
«users»: [
{
«username»: «admin»,
«password»: «hashed_password»,
«role»: «administrator»
},
{
«username»: «client1 «,
«password»: «hashed_password»,
«role»: «client»,
«banks»: ["client-name-image-bank»]
}
]
}
File: banks.json
{
«banks»: [
{
«id»: «1 «,
«name»: «Client Name Image Bank»,
«slug»: «client-name-image-bank»,
«created_at»: «2025-03 -20 «,
«updated_at»: «2025-03 -23 »
}
]
}
File: [bank-slug]/images.json
{
«images»: [
{
«id»: «1 «,
«filename»: «image-name.jpg»,
«original»: "/original/imgs.jpg»,
«preview»: "/preview/imgs.jpg»,
«thumbnail»: "/thumbnail/imgs.jpg»,
«description»: «Lorem ipsum»,
«uploaded_at»: «2025-03 -23 »
}
]
}

Authentication and image processing
Basic solution for login and image scaling
Authentication Flow1. Users (admin or clients) visit the login page2. Authentication is validated against users.json3. Session is created with user role and accessible banks4. If administrator, redirect to admin dashboard5. If client, redirect to their accessible image bank Image Processing Flow1. Admin uploads images through the browser2. Server processes images: • Saves original • Creates500x500 preview • Creates100x100 thumbnail Updates the relevant images.json file with metadata
… and with that we started building
We built it in a way that followed the suggested app overview:
- Core files - login, authentication, admin dashboard, create/edit image bank.
- Image processing – upload and scaling functions.
- Common functions.
- Image bank - client grid view, full size preview and download functionality.
Within a an hour or two, we had a working prototype. Since that I’ve spent about
The app in action
The magic of simplicity
The final system is simple and straightforward:
Admin Side – I log in, see all active image banks, can create new ones, upload images via drag-and-drop, and preview how clients will see their gallery.
Client Side – They get a clean, minimalist gallery showing their images in a grid. Click any image to view full-size. Download individual photos or grab everything as a zip file.
The url – Something like nofont.studio/imagebank/client-name. Professional, memorable, permanent.
Technical simplicity, professional results
This experience is not life changing or technically revolutionary, but it makes a huge difference in how clients perceive my service. Instead of generic WeTransfer pages, although branded, they see a clean, professional gallery that feels like an extension of my brand.
The whole app runs on my existing website hosting, costing me just a dolor or two extra per month.
Next up: How I made accounting bearable by teaching ai to read my invoices and bank statements.
Original prompt:
I would like help building a php based image bank function for my website www.nofont.com. The purpose of the plugin is to get a url like www.nofont.com/client-name-image-bank or www.nofont.com/another-client-image-bank where my clients can view and download images that I have taken for them.
It will be hosted on a Digital Ocean droplet running Nginx.
I have attached wireframes for reference.
Please use css classes and structure from the «Nofont Framework». The css file is in the Project Knowledge.
Functionality:
Users
“Image bank - login.jpg”
Since the image bank will be manually set up by me the user roles can be listed in a separate .json file that can be edited manually via code editor. Two user roles shall be available:
* Administrator: can access the admin interface and crud image banks, images and texts.
* Client: can access the public view specified for at specific image bank that is defined in the .json-file along with username and password.
So no image bank is accessible publicly without logging in.
Administrator functionality
Accessing the image bank admin interface
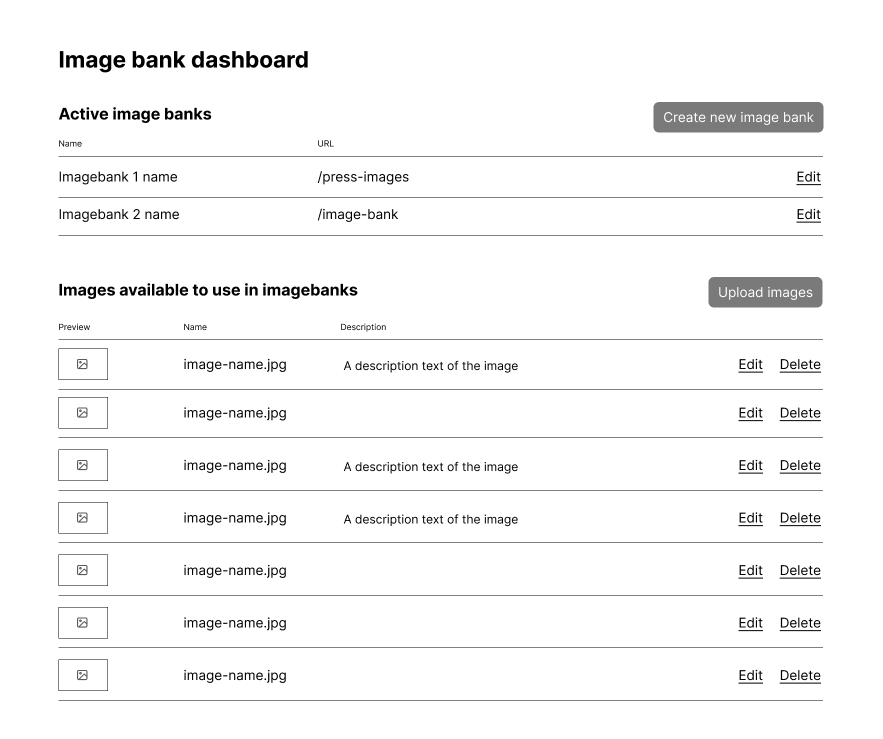
“Image bank - dashboard.jpg”
Only the admin role shall be able log in and view the image bank dashboard. On the dashboard is a list of existing Image banks + a “Create image bank”-button.
Adding a new image bank
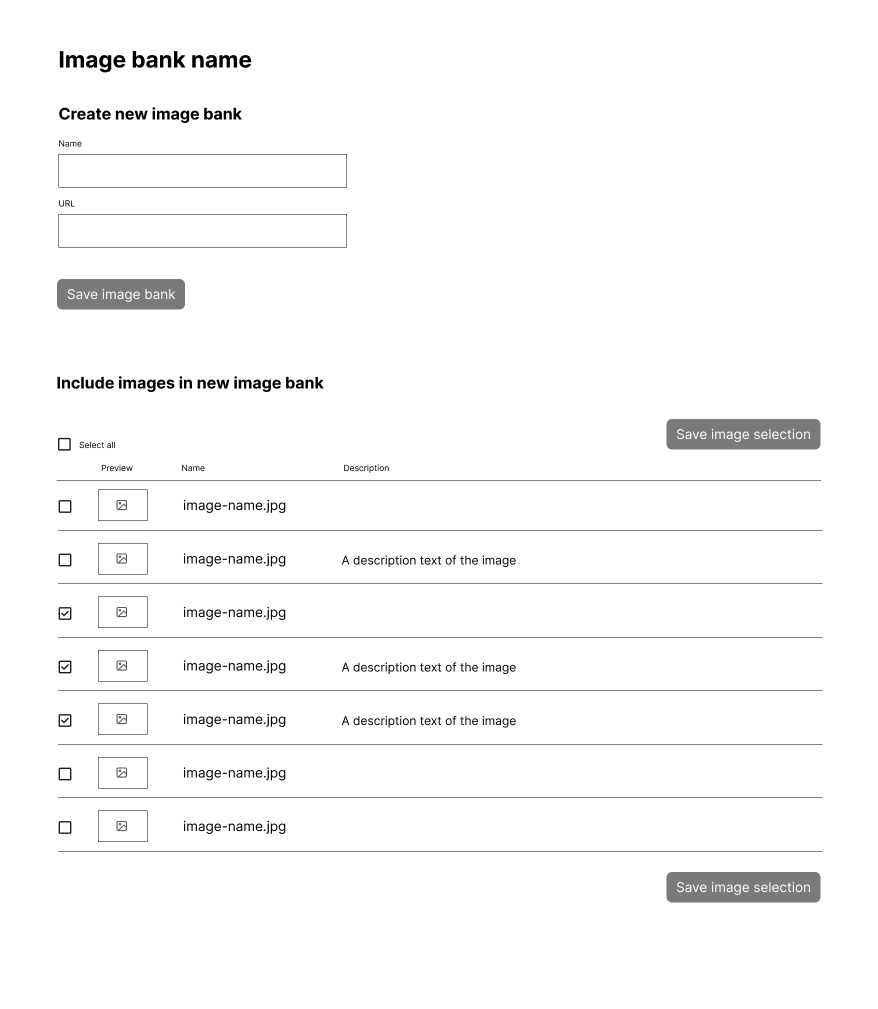
“Image bank - detail view - create or edit image bank.jpg”
Clicking the “Create image bank”-button, or the “Edit”-button for an existing image bank, leads to the image bank details view where the user can name, define an url and upload images to the image bank. If there is already images uploaded to the selected image bank the administrator can see a list of all images here.
Uploading images
Uploading new images is done in via the browsers native upload functionality. All images uploaded to an image bank shall be stored in a folder named after url-slug the image bank has. The only thing is that the user must be able to type in a “Description” text for each uploaded image.
Approved image format: .jpg and .png
Editing images
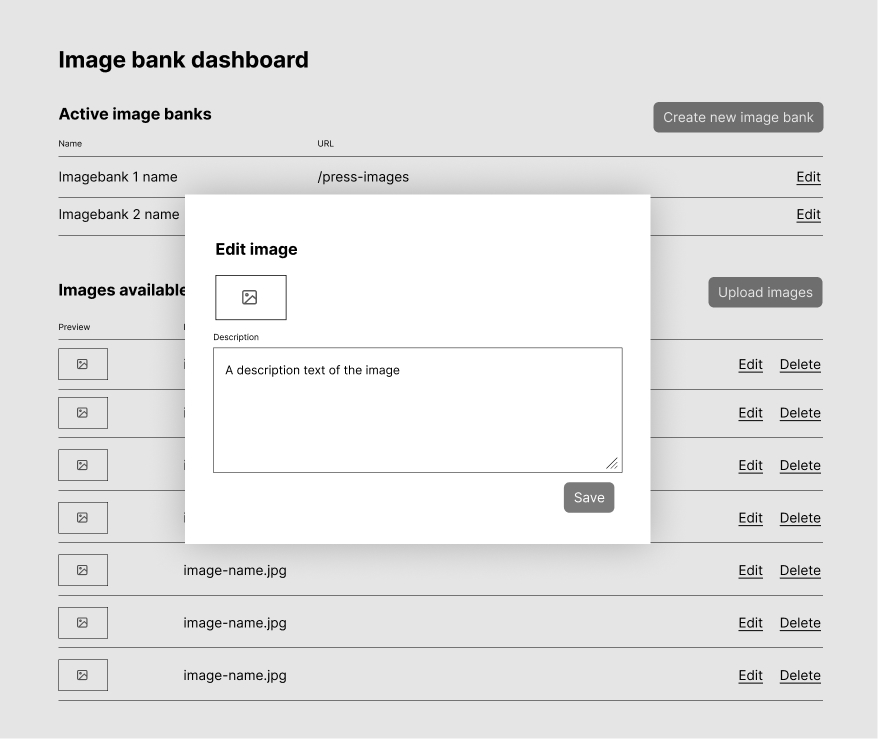
“Image bank - edit image.jpg”
The administrator shall be able to edit each individual image in the lists by clicking the “Edit”-button. The image data is edited via a modal
Image scaling functionality
When an image is uploaded it shall be saved in three versions:
1. Thumbnail - 100x100 px - used in lists
2. Preview - 500x500 (whichever is the longest side of he image) - used in the Masonry-style grid view for each image bank.
3. Original - no scaling - used for downloads
Client functionality
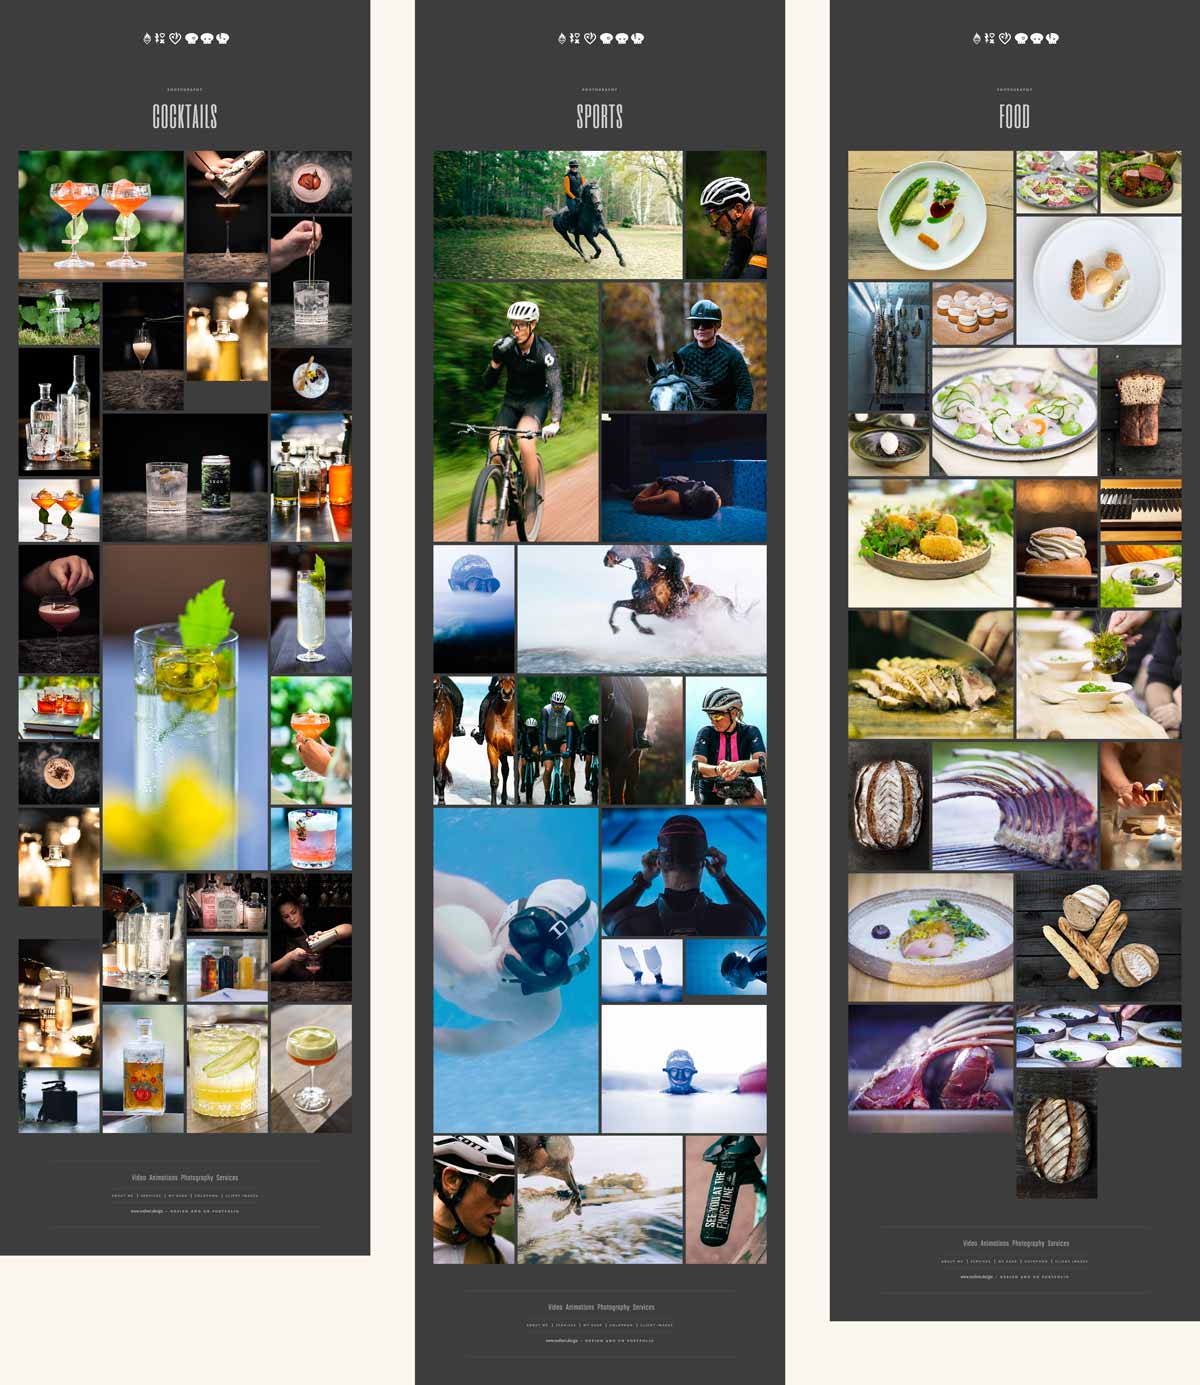
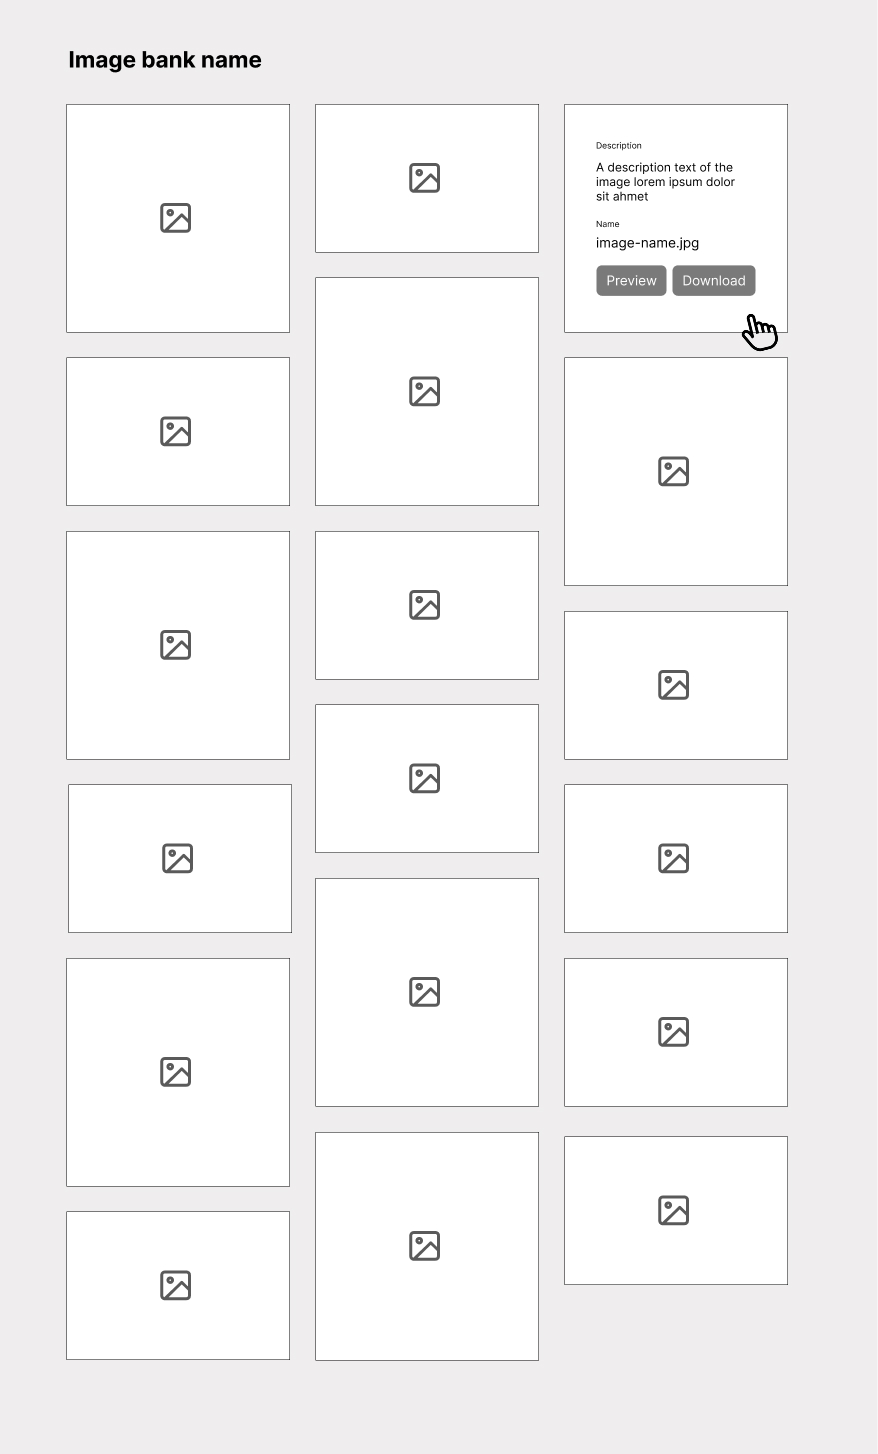
“Image bank - Masonry style public view.jpg”
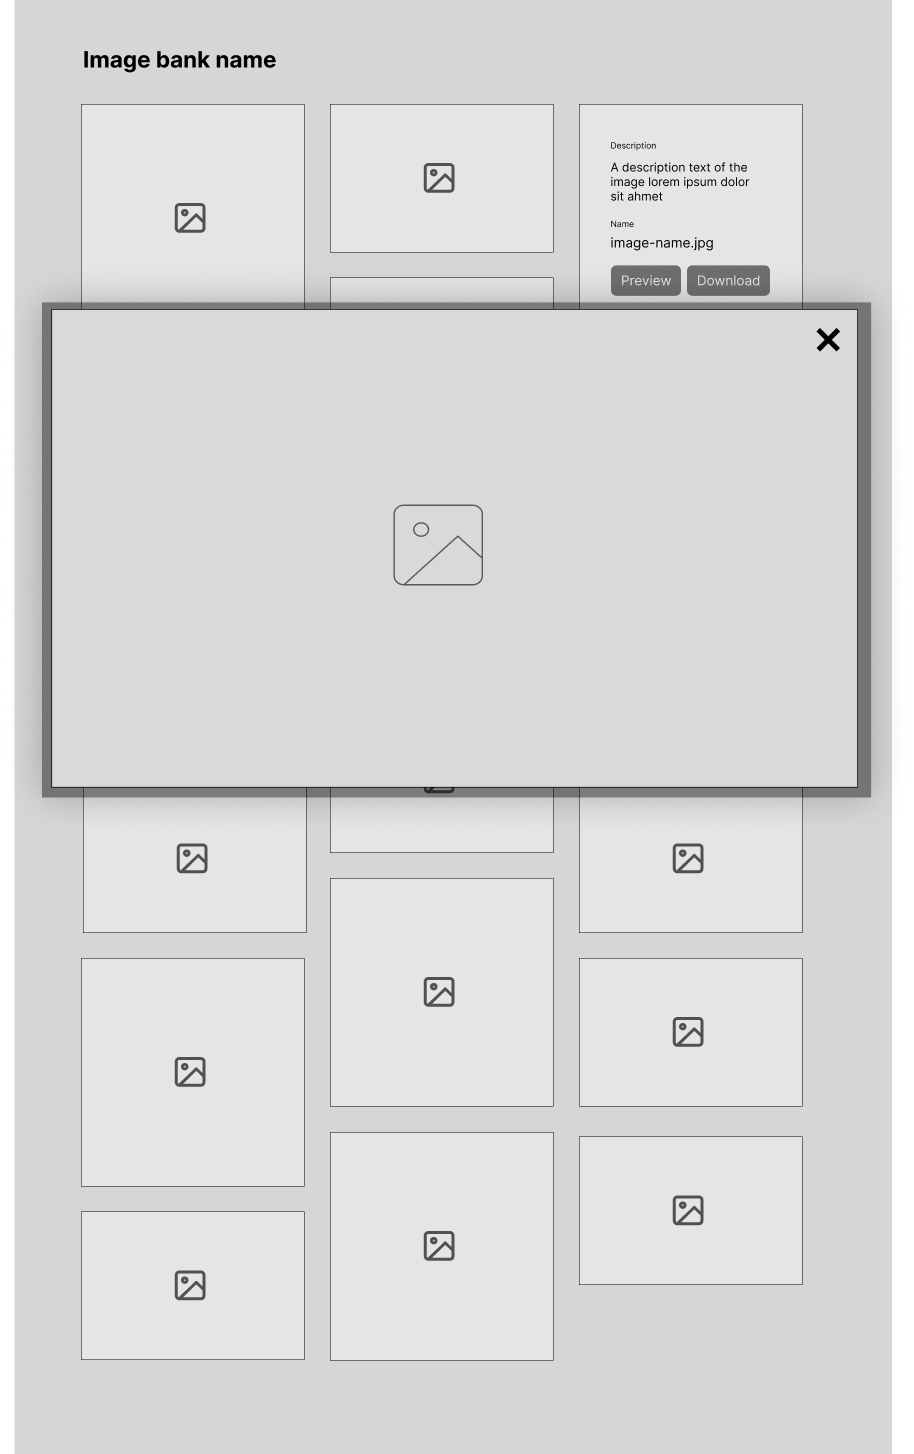
“Image bank - Full size preview image.jpg”
Public viewing of image banks
When a visitor access one of the image banks the page shall list selected images in a Masonry grid style format. On hover the image shall be covered with an overlay that displays: Description, name and buttons for full-screen preview and download. The download button shall download the original high resolution version of the image. See attached wireframe ”5. Image bank - Masonry style public view”.
Proposed file structure
Image-bank/
│
│– index.php
│
│– images
│ │– image-bank-url
│ │– image-bank-url
│ └─ image-bank-url
│
│– public-view.php
│– upload.php
└─ users.json
Questions?
* Do we need a database setup for this? It will be a very low frequently used service, so would creating .json files for storing image bank (id, name, url and image-ids) and image data (id, description and filename) be sufficient instead of a db?